That persistent drip-drip-drip from your outdoor faucet is more than just an annoyance; it’s money and a precious resource literally going down the drain. A leak of just one drip per second can waste over 3,000 gallons of water in a year, according to the EPA’s WaterSense program. But before you dial a plumber and brace for a hefty bill, know this: fixing a leaky outdoor faucet (also known as a hose bib or sillcock) is a repair most homeowners can tackle in under an hour.
This definitive guide will walk you through the entire process, from accurate diagnosis to a permanent fix, ensuring you have the confidence and knowledge to solve the problem yourself.
Quick Summary: Key Takeaways
- Diagnosis is Key: The leak’s location—from the spout or the handle—determines the fix.
- It’s Usually a 5-Cent Part: 90% of the time, the culprit is a worn-out washer or O-ring.
- Safety First: Always, without exception, turn off the water supply to the faucet before starting.
- The Right Tools Make it Easy: You only need a few basic tools: an adjustable wrench, screwdrivers, and possibly a set of Allen keys.
- Photograph as You Go: Take pictures with your phone during disassembly to simplify reassembly.
- Frost-Proof Faucets are Different: They require a specific repair process; misdiagnosing them can lead to water damage inside your wall.
- Prevention is Simple: Proper winterization is the best way to prevent future leaks and catastrophic freeze damage.
Table of Contents
- Understanding Your Outdoor Faucet: Hose Bib vs. Frost-Proof Sillcock
- Step 1: Diagnosing the Leak – Where is the Water Coming From?
- Step 2: Gathering Your Tools and Replacement Parts
- Step 3: The Repair Process – A Step-by-Step Guide
- Repairing a Standard Hose Bib
- Repairing a Leaking Frost-Proof Sillcock
- When to Replace the Entire Faucet
- Proactive Protection: How to Prevent Future Leaks
- Frequently Asked Questions (FAQ)
1. Understanding Your Outdoor Faucet: Hose Bib vs. Frost-Proof Sillcock
Before you grab a wrench, you need to know what you’re working on. There are two primary types of outdoor faucets, and confusing them can lead to an incomplete repair or even water damage.
- Standard Hose Bib: This is the classic, simple faucet. The valve that controls water flow is located right at the spout. When you turn the handle, a stem moves up and down, pressing a washer against a “seat” to stop the water. These are common in warmer climates but vulnerable to freezing.
- Frost-Proof Sillcock: This is a longer faucet designed for cold climates. The actual valve seat is located about 6 to 12 inches inside your home’s wall. When you turn the handle off, it shuts the water off inside the warm(er) wall cavity and allows the water in the extended stem to drain out, preventing freezing. Repairing these is slightly more involved but follows the same basic principles.
How to tell the difference: A frost-proof model will have a long, tubular body that goes through the wall, while a standard bib is short and compact.
2. Step 1: Diagnosing the Leak – Where is the Water Coming From?
Precise diagnosis is 90% of the repair. Here’s how to pinpoint the problem:
| Leak Location | When It Leaks | Most Likely Cause |
|---|---|---|
| From the Spout | A constant drip when the faucet is turned OFF. | A worn-out or damaged rubber washer inside the valve. The washer can’t form a seal against the valve seat. |
| Around the Handle/Stem | Leaking when the faucet is turned ON. | Worn-out O-rings or a deteriorated packing string around the stem. These seals prevent water from escaping around the moving parts. |
If your faucet is leaking from a crack in the metal body itself, the only solution is a full replacement, which we’ll cover later.
3. Step 2: Gathering Your Tools and Replacement Parts
A successful DIY project is all about preparation. Gather these items before you start:
Tools:
- Adjustable wrench (or a dedicated faucet seat wrench)
- Phillips and flat-head screwdrivers
- Allen key set (common for set screws on handle tops)
- Needle-nose pliers (helpful for removing old washers)
Replacement Parts (The Fix Kit):
Instead of guessing, buy a universal faucet repair pack. These inexpensive kits, available at any hardware store, contain an assortment of the most common washers and O-rings. This guarantees you’ll have the right size. Your kit should include:
- Various-sized flat rubber washers
- Various-sized O-rings
- A small roll of packing string (for older models)
- Bonus: A tube of plumber’s grease. Using this on new seals dramatically extends their life and prevents them from sticking.
4. Step 3: The Repair Process – A Step-by-Step Guide
Repairing a Standard Hose Bib
- TURN OFF THE WATER. Locate the shut-off valve for the outdoor faucet. It’s typically found in the basement or crawl space, on the pipe that leads directly to the outside. Turn it clockwise until it stops.
- Relieve Pressure. Go outside and open the faucet handle fully to drain any remaining water from the pipe.
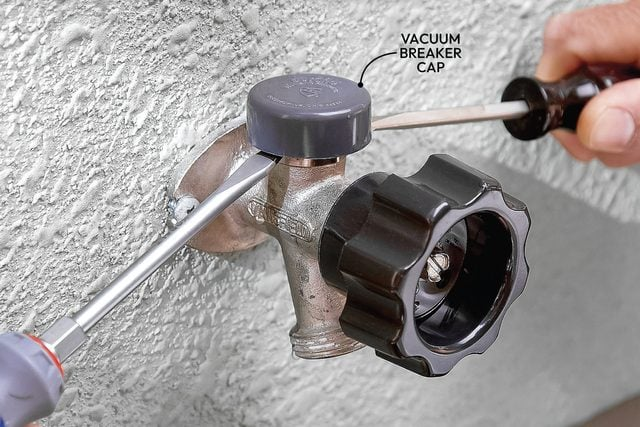
- Remove the Handle. Look for a small plastic or metal cap on top of the handle. Pry it off with a screwdriver to reveal a screw. Remove the screw and pull the handle off. It might be stuck; a few gentle tugs should free it.
- Unthread the Packing Nut. Using your adjustable wrench, grip the large nut (the packing nut) just below where the handle was. Turn it counterclockwise to loosen it. You don’t need to remove it completely, just enough to pull out the entire stem assembly.
- Remove the Stem. Carefully pull the long stem straight out of the faucet body.
- Identify and Replace the Faulty Parts.
- For a Spout Drip: The flat rubber washer is secured by a small brass screw at the bottom of the stem. Remove the screw, pry out the old washer, and install the new one that matches its size and shape exactly.
- For a Handle Leak: You’ll see one or two small O-rings on the stem. Carefully pry the old ones off and slide the new, identical O-rings into place. Pro Tip: Coat the new O-rings with a thin layer of plumber’s grease before reassembly.
- Reassemble in Reverse Order. Insert the stem back into the faucet body, hand-tighten the packing nut, and then use the wrench to give it a final snug turn—do not over-tighten. Reattach the handle and the decorative cap.
- Test the Repair. Slowly turn the water supply back on. Then, go outside and turn the faucet on and off. Check diligently for leaks at both the spout and the handle.
Repairing a Leaking Frost-Proof Sillcock
The process is very similar, with one critical difference: the stem is much longer.
- Turn Off Water and Relieve Pressure. (Same as above).
- Remove the Handle. (Same as above).
- Unthread the Packing Nut. You’ll see a large hexagonal nut where the stem enters the wall. Loosen this with your wrench.
- Pull the Entire Long Stem. Carefully pull the long, telescoping stem assembly straight out. You are pulling the inner workings of the valve from inside your wall to the outside.
- Replace the Washer. At the very end of this long stem, you will find the washer, held by a small screw. Replace this washer just as you would on a standard bib. This is what stops drips from the spout. Also, check for and replace any O-rings on the stem that seals the unit inside the pipe.
- Reinsert and Reassemble. Carefully guide the stem back into the faucet body, ensuring it seats properly inside. Re-tighten the packing nut and handle.
- Test Thoroughly. Turn the water on and check for leaks outside and, crucially, inside at the point where the faucet enters the wall.
5. When to Replace the Entire Faucet
Repair isn’t always the answer. You should consider a full hose bib or sillcock replacement if you find:
- A visible crack in the faucet body.
- Heavy, crusty corrosion that prevents disassembly or compromises the metal.
- Stripped threads on the stem or packing nut.
- A damaged valve seat inside the faucet. You can sometimes resurface this with a special tool called a seat dresser, but replacement is often easier for a DIYer.
- The leak persists after replacing all washers and O-rings.
Replacing a standard bib is a straightforward job involving two wrenches. Replacing a frost-proof model is more complex, as it involves working inside your wall, and may be a job for a professional if you’re not comfortable.
6. Proactive Protection: How to Prevent Future Leaks
The best fix is the one you never have to make.
- Disconnect Hoses in Winter: Always disconnect and drain garden hoses before the first freeze. A hose left attached is the #1 cause of frozen faucets.
- Install a Frost-Proof Faucet: If you live in a freezing climate and have old standard bibs, upgrading to frost-proof sillcocks is a wise investment.
- Use Silicone Lubricant: Annually, a small spray of silicone lubricant on the stem O-rings can keep them pliable and prevent wear.
- Shut Off Interior Valves: If you have shut-off valves for outdoor lines, close them in the winter and open the outdoor faucet to drain any residual water.
7. Frequently Asked Questions (FAQ)
1. My faucet won’t stop dripping after I replaced the washer. What’s wrong?
You may have a pitted or corroded valve seat that is shredding your new washers. You can attempt to smooth it with a seat dressing tool, but replacing the entire faucet is often a more permanent solution.
2. The packing nut is completely seized and won’t budge. What can I do?
Apply a penetrating oil like WD-40 or Liquid Wrench directly to the threads. Let it sit for 15-30 minutes, then try again. Using a wrench with a longer handle for more leverage can also help, but be careful not to break the faucet.
3. Is it better to repair or just replace an old, corroded faucet?
If the faucet body is heavily corroded, replacement is almost always the better option. The corrosion will continue to cause problems with seals and makes future repairs difficult.
4. What’s the average cost for a plumber to fix a leaky outdoor faucet?
According to HomeAdvisor data (2023), the typical cost ranges from $150 to $350, depending on your location and the complexity of the job. A simple washer replacement is at the lower end, while a full sillcock replacement is at the higher end.
5. How tight should I make the packing nut?
Snug is enough. Over-tightening can crush the O-rings or packing material and actually cause a leak or make the handle impossible to turn. Tighten until the leak around the stem stops when the water is on.
6. Can I use a generic washer, or do I need a specific one?
While generic washers often work, for a perfect seal, it’s best to take the old stem to the hardware store and find an exact match in size, shape, and material.
7. My frost-proof faucet drips from the spout all winter long. Why?
This almost certainly means it was not installed with a proper downward pitch to allow water to drain out. The standing water inside freezes and cracks the long copper tube, requiring a full replacement.
8. What is the black, tar-like substance on my stem?
That is old, deteriorated packing string. Scrape it off thoroughly and replace it with new packing string or, on newer models, simply rely on the O-rings.
9. Should I use Teflon tape on the stem threads?
No. The threads do not seal the water; the O-rings or packing do. Teflon tape on these threads is unnecessary and can sometimes interfere with a proper seal.
10. Why does water trickle out of the spout when I have a hose connected, even when the faucet is off?
This is called “back-siphoning” and is a sign that the anti-siphon device inside the faucet (or in a separate vacuum breaker attached to it) has failed. This is a critical safety feature to prevent contaminated hose water from flowing back into your home’s drinking supply. The faucet should be replaced.


