lright, so you’re deep into your chain-link fence project, and you’ve hit a common snag: figuring out the hardware. You’re staring at a bag of tension bands and a terminal post, wondering, “How many of these things do I actually need?” Using too few is a surefire way to end up with a weak, saggy fence. Using too many is just a waste of money. Let’s cut through the confusion and get you the straight answer you need to build a fence that lasts.
- The Magic Number: You need three tension bands per terminal post.
- Post Type Matters: This rule is only for terminal posts (end, corner, and gate posts). Line posts don’t use tension bands.
- Spacing is Key: The three bands should be spaced evenly down the post where the tension bar will go.
- Why Three? It creates a super strong connection point that can handle the massive tension from the stretched chain-link fabric.
- Universal Standard: This is the industry-standard practice recommended by fence professionals and material suppliers.
- Goal: To ensure your fence is taut, secure, and won’t pull away from the post over time.
Table of Contents
Introduction
The Short & Sweet Answer
What Are Tension Bands Actually For?
Terminal Posts vs. Line Posts: Know the Difference
Step-by-Step: How to Install Tension Bands
What Happens If You Use Too Few?
Frequently Asked Questions (FAQs)
The Short & Sweet Answer
Let’s not bury the lede. For a standard residential chain-link fence, you need to use three tension bands per terminal post.
A terminal post is any post that has to handle the pull or tension of the fence fabric. This includes:
- End Posts: The very last post in a run.
- Corner Posts: Where the fence changes direction.
- Gate Posts: The posts that your gate attaches to.
These posts bear the brunt of the force, so they need the extra reinforcement that three tension bands provide.
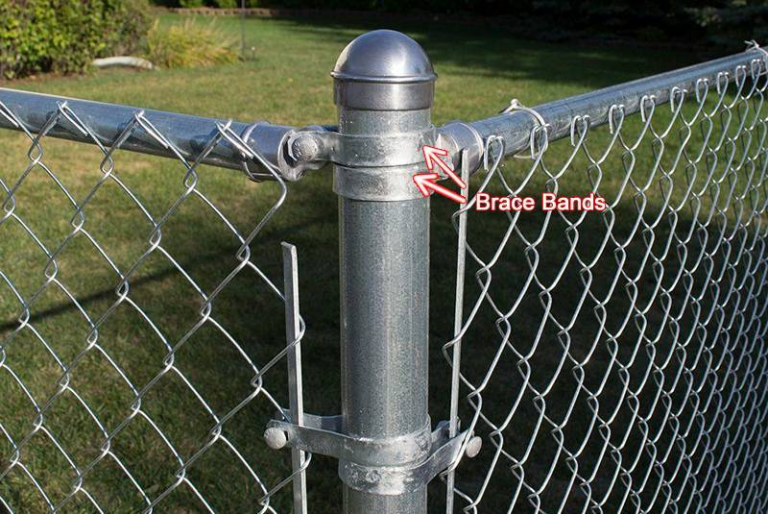
What Are Tension Bands Actually For?
Before we go further, it helps to know what these things do. A tension band isn’t just a fancy washer; it’s a critical component.
Think of it this way: the chain-link fabric is like a big spring. When you stretch it tight between two posts, it creates a huge amount of horizontal pulling force. The tension band’s job is to:
- Hold the “tension bar” (a flat metal bar that the fabric gets woven to) securely against the post.
- Transfer that massive pulling force from the fabric, through the tension bar, and directly into the strong terminal post buried in the ground.
Without them, the fabric would just rip right off the post. They are the essential link between the flexible mesh and the rigid post structure.
Table: Hardware Guide for Different Fence Posts
| Post Type | Number of Tension Bands | Purpose |
|---|---|---|
| Terminal Post (End, Corner, Gate) | 3 | To secure the tension bar and handle high tension forces. |
| Line Post (In-the-middle posts) | 0 | Only serves to support the top rail and fabric; no tension is applied here. |
Terminal Posts vs. Line Posts: Know the Difference
This is the most important part of understanding how many tension bands per post you need. You don’t use them on every post.
- Terminal Posts: These are the anchors of your fence. They are set in concrete and are built to handle stress. They are typically larger in diameter (e.g., 2 3/8″ or 2 1/2″) than line posts. As we’ve established, these get three tension bands.
- Line Posts: These are the posts in between the terminal posts. They are just for support, not for handling the end tension. The fence fabric is simply tied to them with aluminum wire (called “fence ties”). They get zero tension bands.
If you’re putting tension bands on a line post, you’re doing it wrong and wasting material.
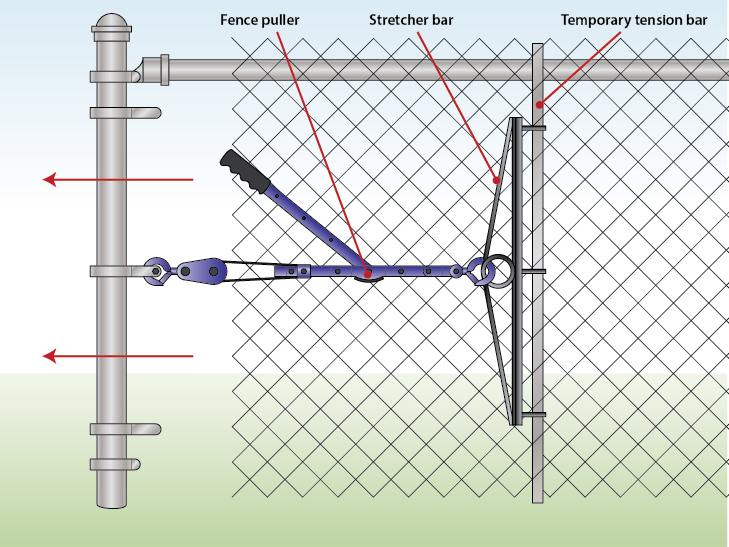
Step-by-Step: How to Install Tension Bands
Okay, you have your three bands per post. Now what?
- Position the Tension Bar: Slide the narrow, flat tension bar vertically through the links of the chain-link fabric at the very end of your run.
- Place the First Band: Slide a tension band onto the post. Position it so it will align with the top hole of the tension bar.
- Add the Other Two: Slide two more tension bands onto the post, spacing them evenly so they will align with the remaining holes on the tension bar. A good rule of thumb is to place one near the top, one near the bottom, and one in the middle.
- Attach the Bar: Stand the tension bar (with fabric attached) against the post. Line up the holes in the tension bar with the loops on the tension bands.
- Bolt It Tight: Insert a carriage bolt through each tension band and the corresponding hole in the tension bar. Secure each one with a nut and washer, and tighten them down with a wrench until they are absolutely snug. This connection must be rock solid.
What Happens If You Use Too Few?
Can you get away with two tension bands? Maybe. Should you? Absolutely not.
Using fewer than three tension bands per post is a major shortcut that compromises your fence’s integrity. Here’s what can happen:
- Sagging Fabric: The insufficient grip allows the tension bar to twist or pull away slightly, creating immediate sag.
- Bent Post: The immense force of the tension becomes concentrated on one or two points instead of being distributed evenly, which can actually bend your terminal post over time.
- Failed Connection: Under stress, the bolts can rip through the tension bar or the bands themselves can fail, causing a entire section of your fence to collapse.
Following the three-tension-bands-per-post rule is cheap insurance against having to redo the entire job later.